Small tweaks like bullet points, curved text, equations, and zoom-in, attract attention quickly. Whether you’re a student, working professional, or business analyst looking to make bullet points in Google Slides, you’re in the right place.
Google Slides allows you to add bulleted text on any platform be it Chromebook, iPad, or Android. Moreover, you can pick and choose between varieties of list icons. In this article, I’ll explain it step by step with requisite screenshots.
There are two ways to create bullet points on a PC or laptop: a keyboard shortcut and the Insert option within Google Slides. Let’s go through each.
1. Using the Insert Menu
The first method involves using the cursor, which is a little better in terms of the versatility it offers. Follow the below steps:
- Open your Google Slides file.
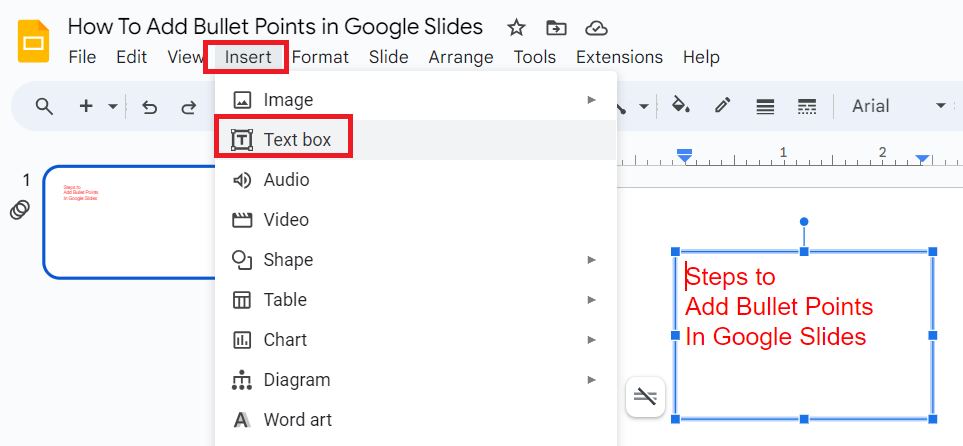
- Click on “Insert” from the main menu and select “Text box”.
- Enter all the text you want to appear as bullet points. Separate the points with the enter key.
- Adjust the size and position of the text box. Choose the fonts and font size accordingly.
- Select all the text that you want to appear as bullet points.
- Select the dropdown arrow next to the bulleted list option. Select the type of bullets you want.
Using this method allows you to choose from different bullet types which is better for formatting options.
2. Using a Keyboard Shortcut
We all love shortcuts. Keyboard shortcuts go hand in hand with writing. At times we almost forget using the mouse or any other form of input. Hence this is the most popular and the most convenient way.
- For Windows Users: Press and hold the Ctrl + Shift + 8.
- For Mac Users: Press and hold the Command + Shift + 8.
Note: You’ll only get the default style of bullets with this method.
Adding Bullet Points in Google Slides Mobile App
Because of the limited screen space, there are a lot of options on Google Slides that you may not see on the mobile app version but if you know your way around the app then you can locate almost all options easily.
Luckily, formatting options like bulleting a group of text are present right there on the screen in a toolbar. Follow the below simple steps:
- Open your Google Slides file from the app.
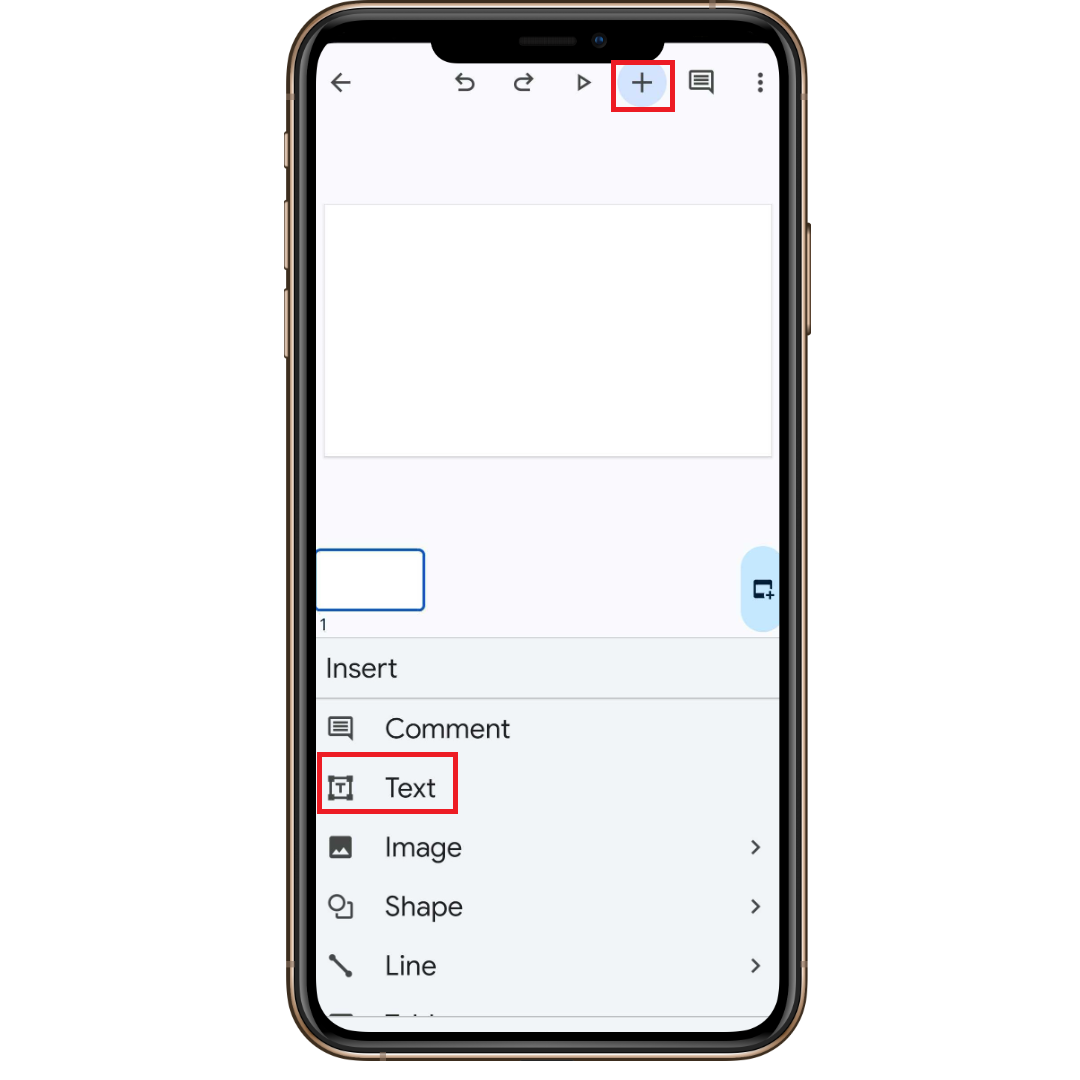
- Click on “+ (plus)” from the main menu.
- Select “Text box”.
- Enter all the text you want to appear as bullet points. Separate the points with the enter key.
- Adjust the size and position of the text box. Choose the fonts, color, and font size accordingly.
- Select all the text that you want to appear as bullet points.
- Tap on the bullet icon from the toolbar.
- Select the check mark once your bulleting is complete.
Note: You may not see different bulleting options on the mobile app version. But you can always access the same file on the web version and edit it if required.
Frequently Asked Questions
You can customize your bullet points by clicking the downward arrow next to the bullets button on the formatting toolbar. This will open up a menu with bullet-point style options including colors, symbols, and numbered lists. Select your preferred option to change the style.
To put sub-bullet points in Google Slides, simply highlight the text you want indented under the main bullet point then click the “Increase Indent” button on the formatting toolbar. This will shift that text over and a secondary style sub-bullet will appear. You can create multiple levels of sub-bullets this way for nested outlines in your presentation slides.
To remove any bullet point, simply highlight the point and click the “Bullets” button again on the formatting toolbar to toggle the bullets off. The bullet point will disappear but the text will remain.
Wrap Up!
Most insights and reports have key takeaways laid out in bullet pointers. It’s important to use them in your Google Slides as presentations are all about making the most of the attention span you garner.
By now, you should have learned how to do it. A word of advice would be to avoid lengthy text. Check the word count of your Slides and maintain it. If you have any further questions, please comment below.


Leave a Reply