Spotify and AirPods are two state-of-the-art products that represent the best of both worlds. While Spotify is the world’s leading music streaming platform, AirPods has emerged as an ideal replacement for the gigantic headphones you have to carry for good quality music listening.
Most of us rely on auto settings or default settings for AirPods and AirPods Pro while listening to music. While the stock settings do a great job, a little dive down the settings can allow you to maximize the capabilities of both.
In this article, I will suggest some key equalizer settings you should consider for both Spotify and your AirPods. I will then take you through how you can set up a great equalizer by altering a few basic settings that guarantee to uplift your overall experience.
AirPods Settings & Optimizations
Here is a list of settings you should consider changing to maximize the sound quality of your AirPods and AirPods Pro while listening to Spotify.
For AirPods:
- Update Firmware: Just like any other hardware for a computer, your AirPods also get firmware updates from the makers. These updates optimize the capabilities of your AirPods and AirPods Pro. Check the official product page on the Apple website or check from Settings > Bluetooth > select “i” next to your AirPods from the “My Devices” list and tap on “Version” in the “About “tab to update the firmware.
- Spatial Audio: From the 3rd generation onwards, Apple decided to roll out the Spatial Audio feature to regular AirPods as well. This feature brings in a surround sound kind of effect which makes your listening experience quite immersive.
For AirPods Pro:
You can make the same updates for Pro as done for AirPods. However, there are other settings you might consider to level up your listening experience:
- Tip Sizes: Upon selecting “i” next to the AirPods Pro listed in the “My Devices” tab of your Bluetooth settings, you also get to see an option to test the tip sizes of your AirPods Pro. You get a medium size, but Apple offers 3 different tip sizes, which you can change later.
- Noise Cancellation: You get 3 different modes of noise cancellation types with your AirPods Pro. The Noise Cancellation feature is turned off by default, but you can select between Transparency (which lets important background sounds in), Adaptive (which adapts to the environment you are in and decides whether background sounds are needed or not) and Noise Cancellation (which blocks every unnecessary noise from the background).
Spotify Equalizer Settings to Get the Best Out of AirPods & AirPods Pro
Dance: Often used while playing dance tracks, this equalizer enhances the bass and minimizes the treble. This captures the key beats, and you can catch the rhythm of the song very well.
For tracks based on electronic music and dance numbers, this is pretty much an ideal choice of equalizer.
Hip-Hop: As the name suggests, is an ideal choice for hip-hop and rap music. It focuses on the deeper beats of the music and makes the vocals sound a little clearer. It maintains the fine balance between maximizing the vocals and catching the beats by ramping up the sub-bass and bass.
Bass Booster: This setting ups the bass levels for all frequencies. It optimizes low-frequency bass beats and enhances the key beats of the track. It is ideal for hip-hop, heavy metal, and EDM.
Loudness: This setting basically enhances the mid and lower ends of frequencies, which makes the whole track sound louder.
It is very helpful when you are listening to music amidst louder background noises. Both the bass and treble are on a boost with this setting.
Small Speaker: Although it was designed to optimize the listening experience through smaller speakers of mobile phones, these settings enhance the low sounds in music and slightly boost the high sounds to balance it up.
Music could sound a little flat with this preset, but if you like a speaker-like experience through your AirPods, then this equalizer is quite perfect.
Vocal Booster: This one is ideal if you want to hear the vocals of your favorite artist in a crystal clear form. This equalizer enhances the sound of human vocals and separates it from other sounds in the mid-range frequencies.
Classical: Classical equalizer is ideal for classical music. It focuses on making the sound clean overall instead of picking out any one range of frequency.
This balances the sounds of vocals and instruments, which allows you to soak in the composition.
Steps To Change EQ Settings on Spotify
If you are new to the world of equalizers or if you are new to Spotify, this section will help you access the equalizer settings. Follow these simple steps to change equalizers and their respective settings.
Note: The steps remain the same for mobile and desktop versions of Spotify, but the location of the settings may differ.
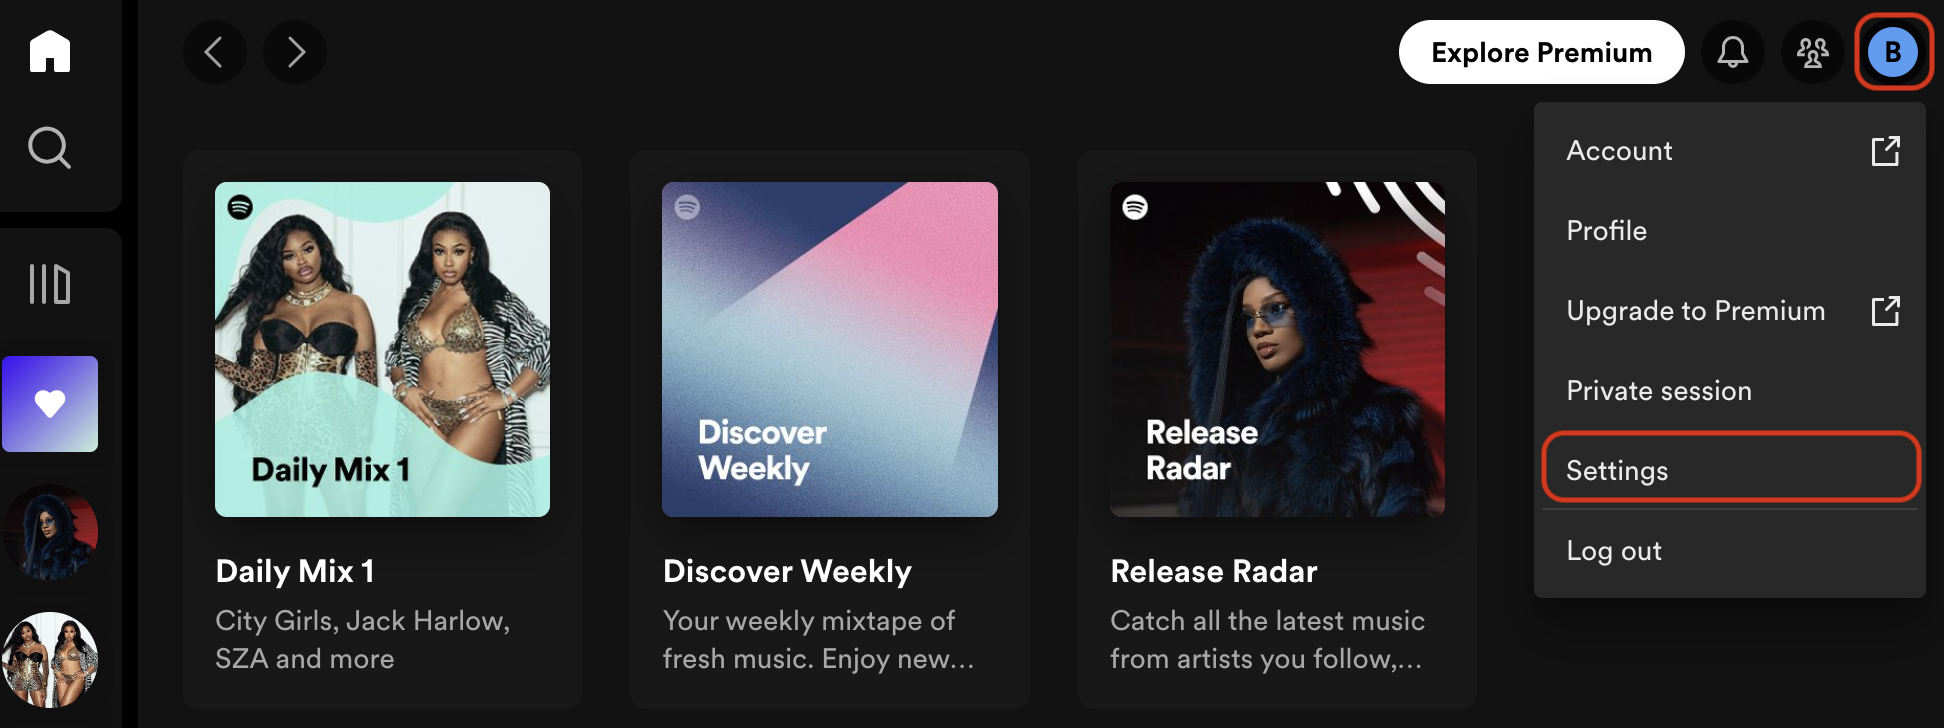
- Go to your profile. You should be able to see your profile picture in the alphabet of your first name inside a circle if you haven’t kept a profile picture. Select that.
- Upon selecting your profile, select “Settings”.
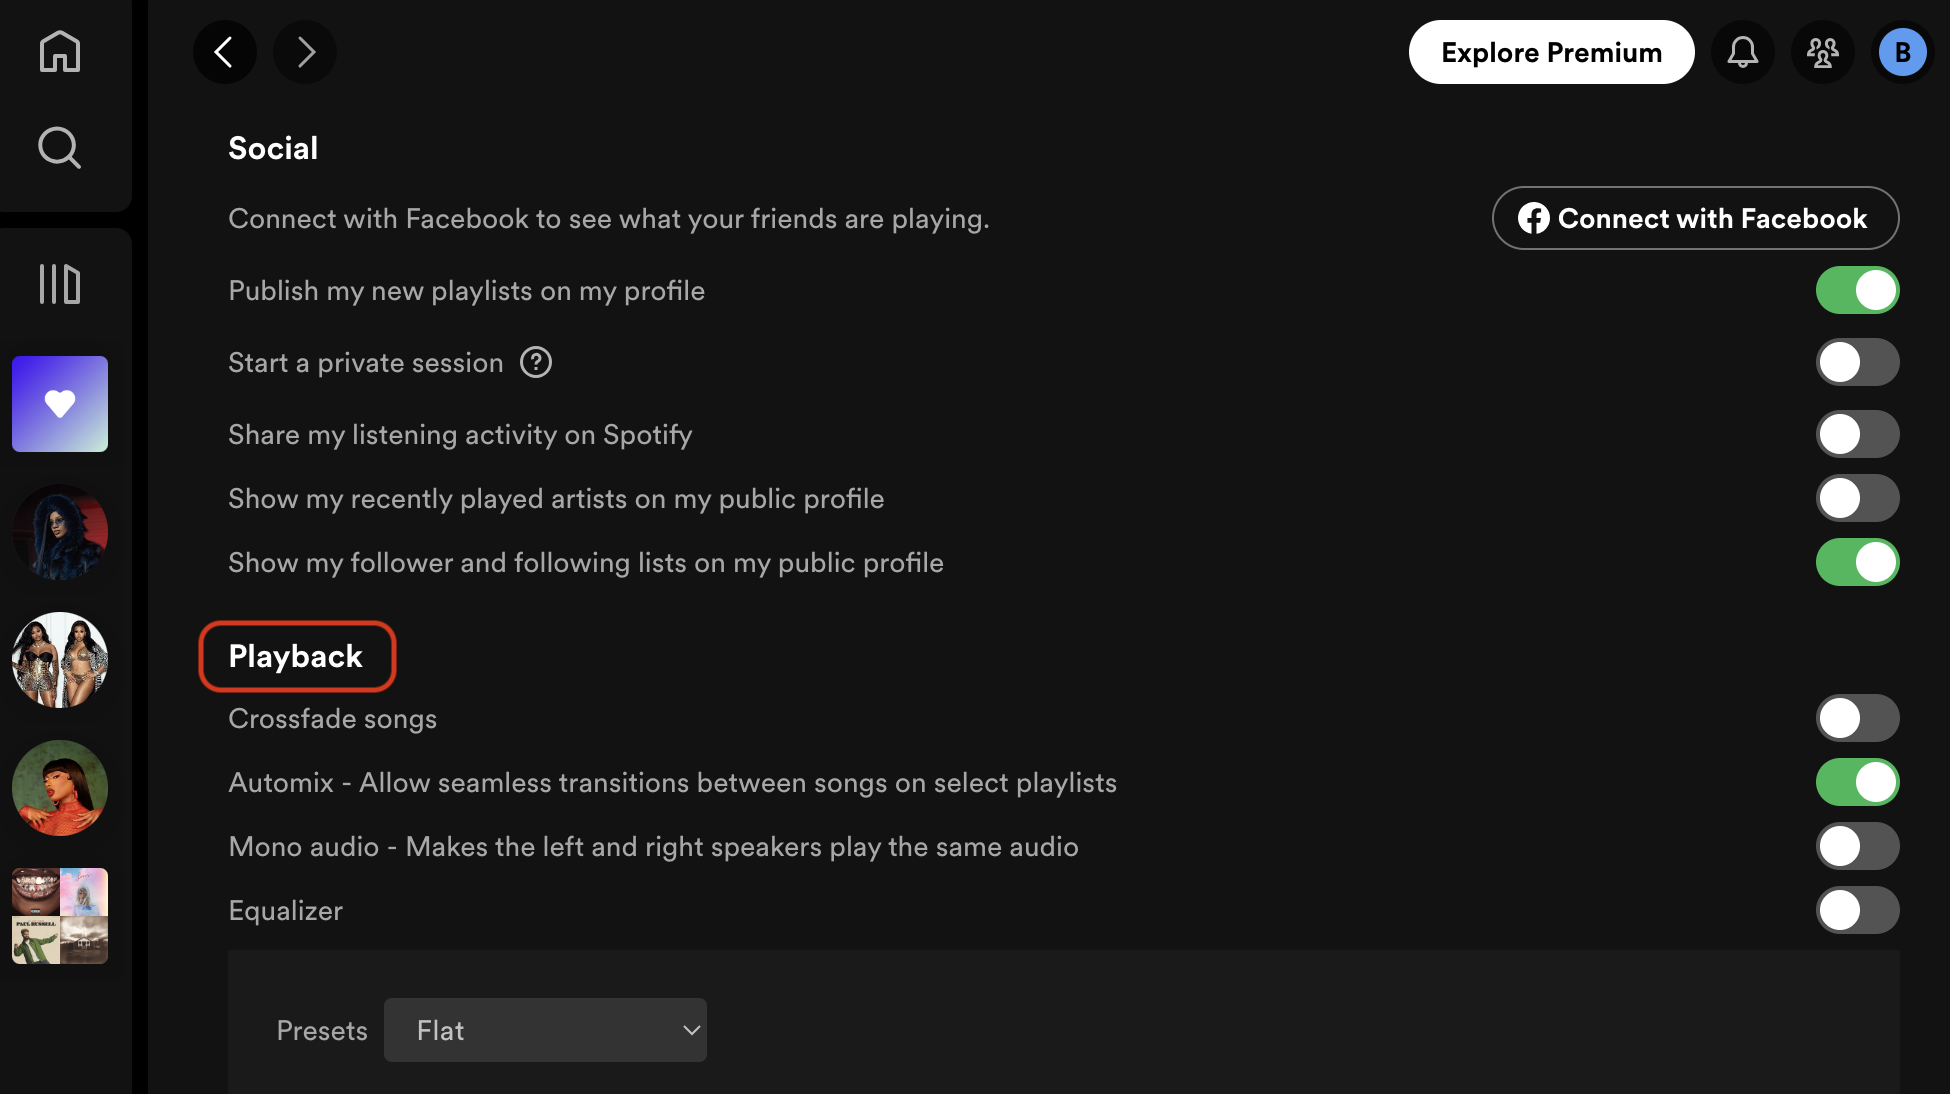
- In the Settings tab, scroll to “Playback” in the list of different settings.
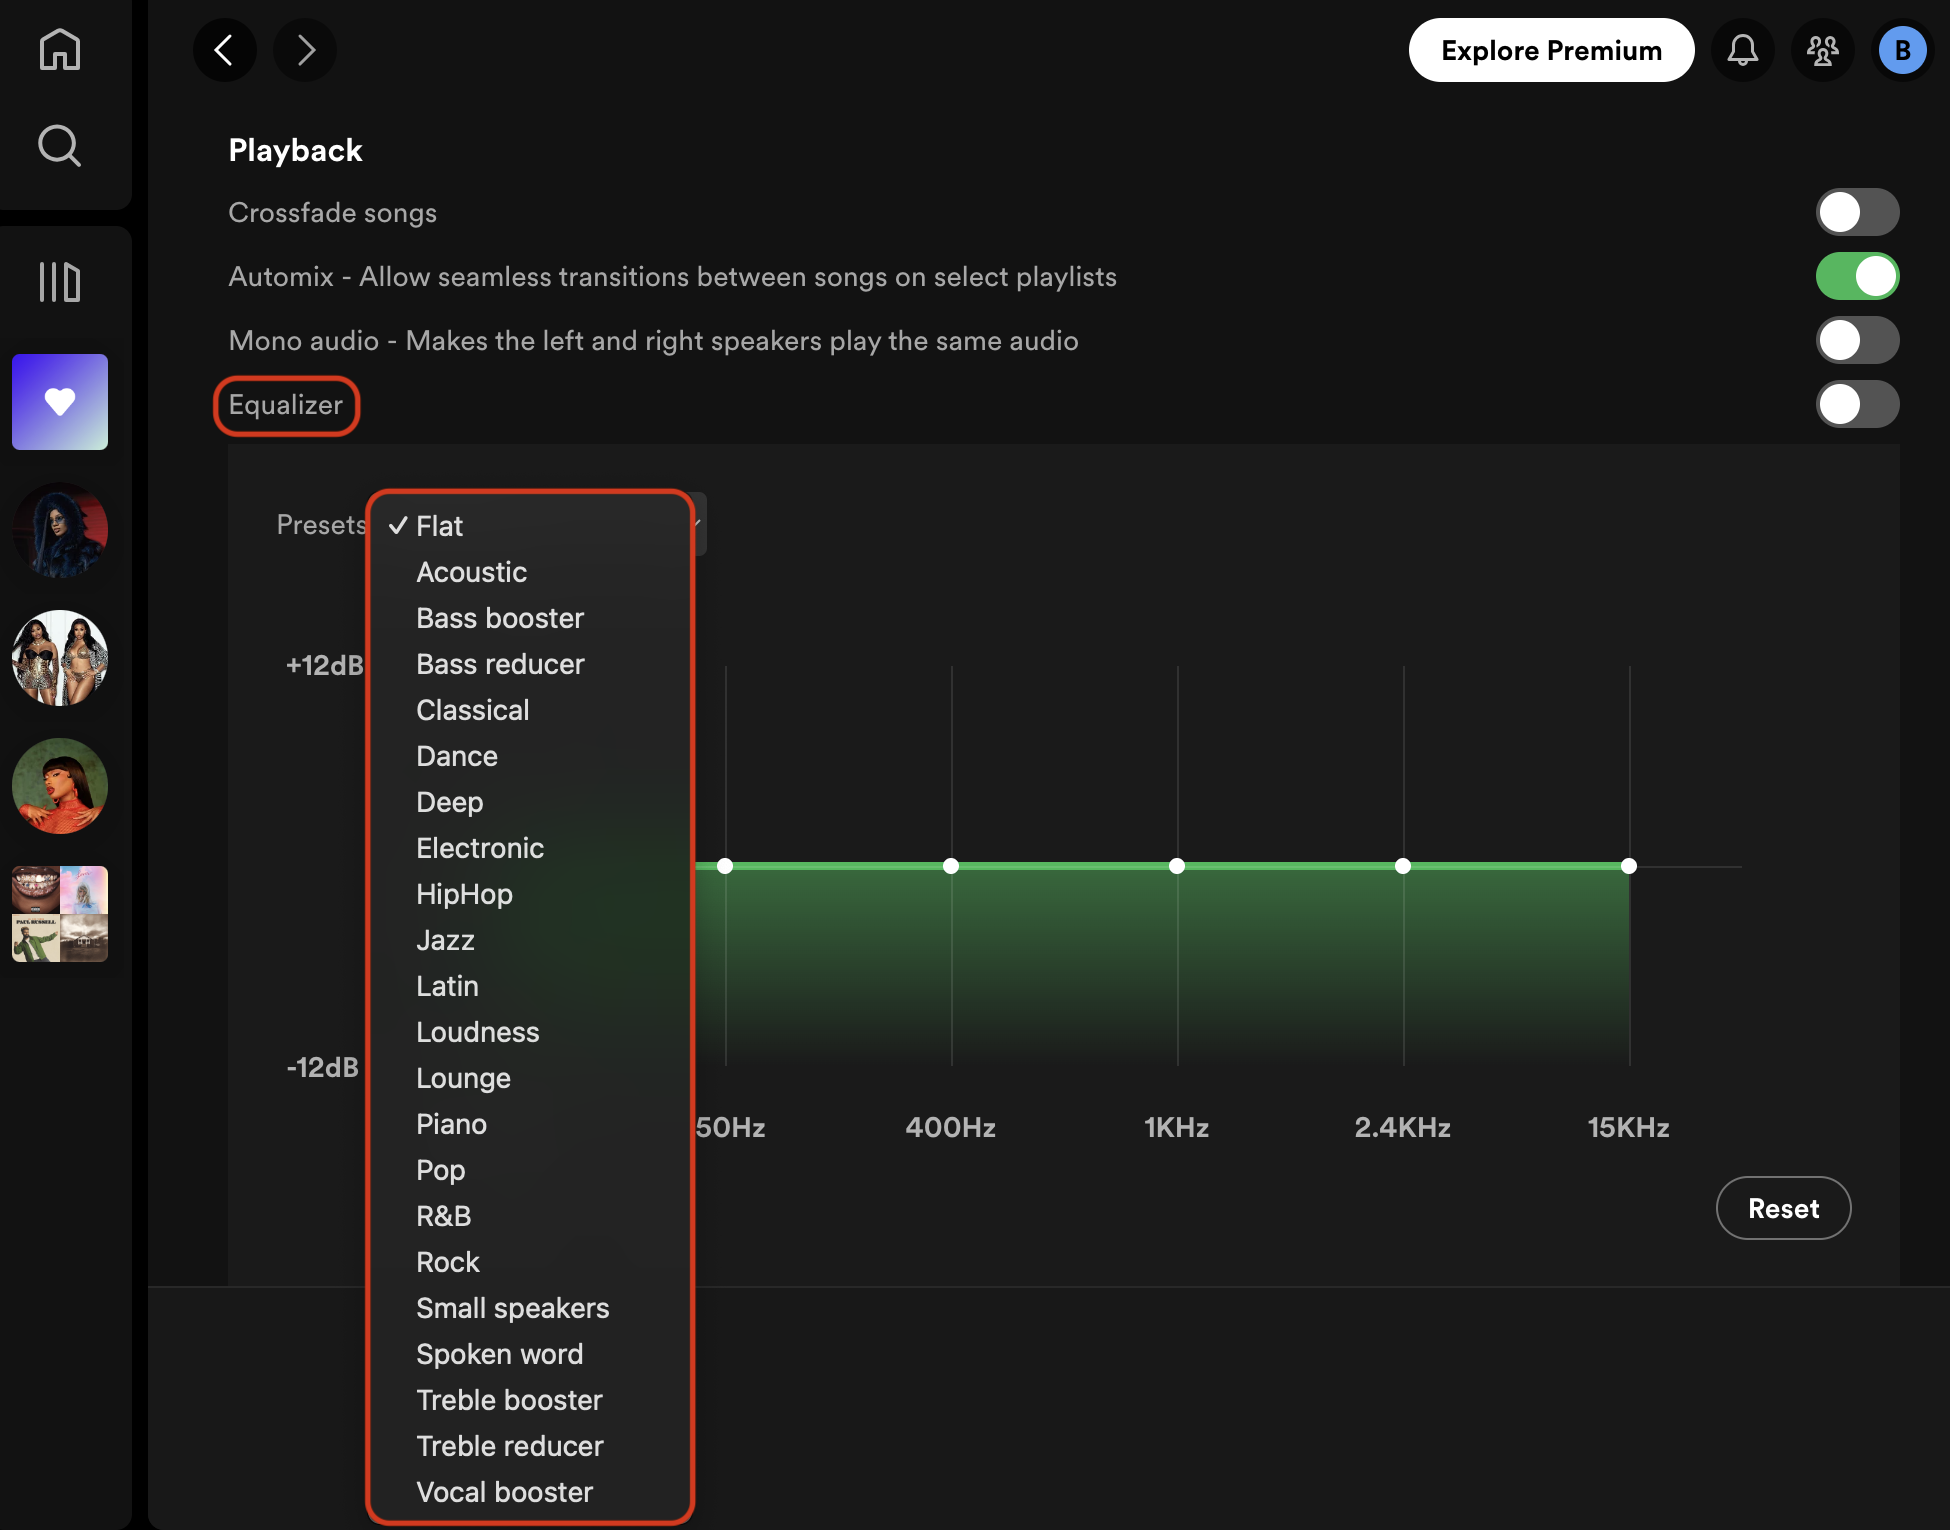
- Among the Playback tab, you should be able to locate the “Equalizer” tab.
- Within the “Equalizer” tab, you should be able to see a list of different equalizers. Select any one preset that you like.
- Make appropriate changes to different aspects of these equalizes like bass, treble, etc. Save the changes and go back to music playback.
- That is it. You have successfully chosen a preset and made changes to that based on your preferences.
Wrap Up!
So there you go. Choosing a preset on Spotify that complements the capabilities of AirPods is rather easy. All you have to do is locate the equalizer settings and choose from the presets.
What requires a little more understanding of sound and detailing is making custom changes based on your hearing preferences.
It takes time and practice to perfect the altercations on equalizer presets. But till you get good at making custom changes, you can choose from the amazing presets that enhance the listening experience on AirPods and AirPods Pro.
Happy listening!


Leave a Reply