Flashcards are great for learning with a visual touch. Many language learning apps use it. Even studies show that we are more likely to remember visuals over something we read or hear.
Earlier, it was only possible to make flashcards using designing tools. But in today’s times, you can easily add them even in text-intensive platforms like Google Docs. What seems like a tough task is a practice of alignment.
Nevertheless, through this article, I have covered everything you would want to know about flashcards. So, without further ado, let’s dig in!
Steps To Make Flashcards on Google Docs
All you need to create is a subject and a relevant image for it. For instance, if your flashcard is about wild animals then you will need a list of names you want to use and their pictures.
Once you have all of it, follow the simple steps below:
- Open the Google Docs file. Make sure the page you are on is blank.
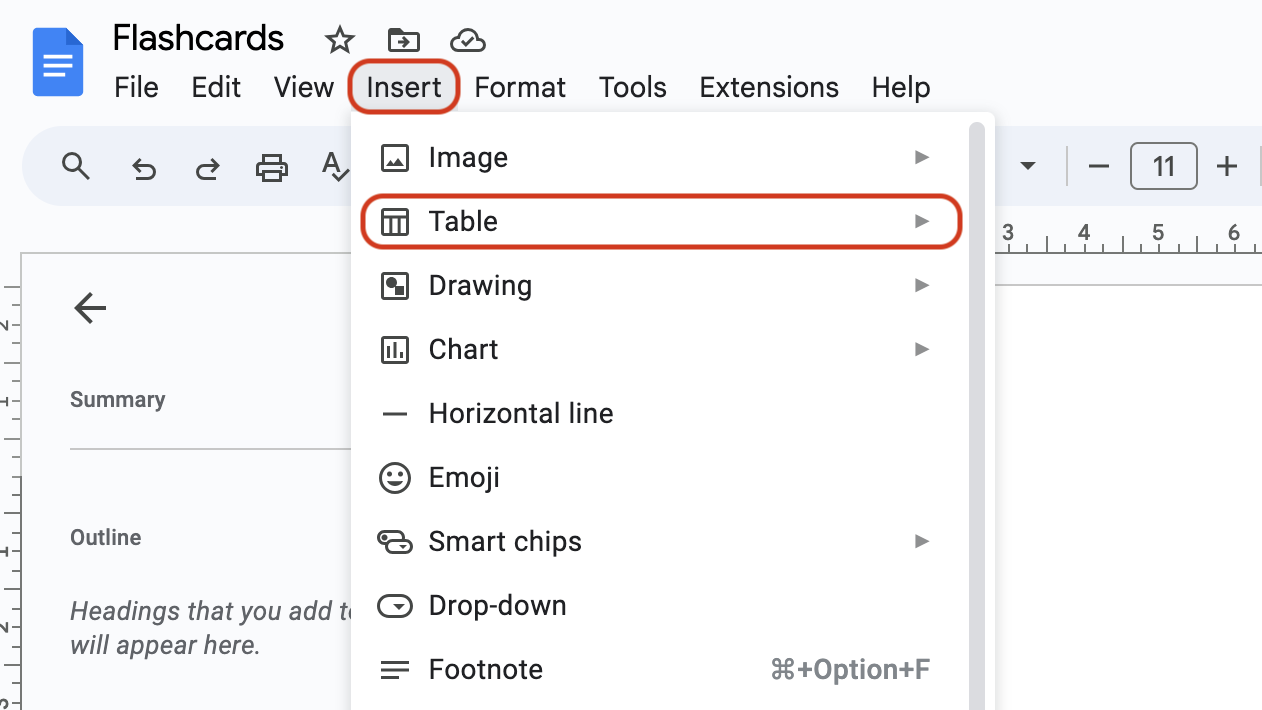
- Go to “Insert” from the main menu.
- Here, click on the “Table” option.
- Decide what dimension of the table you want to add. Select a table with just 2 columns and 4 rows to make the most of the landscape layout.
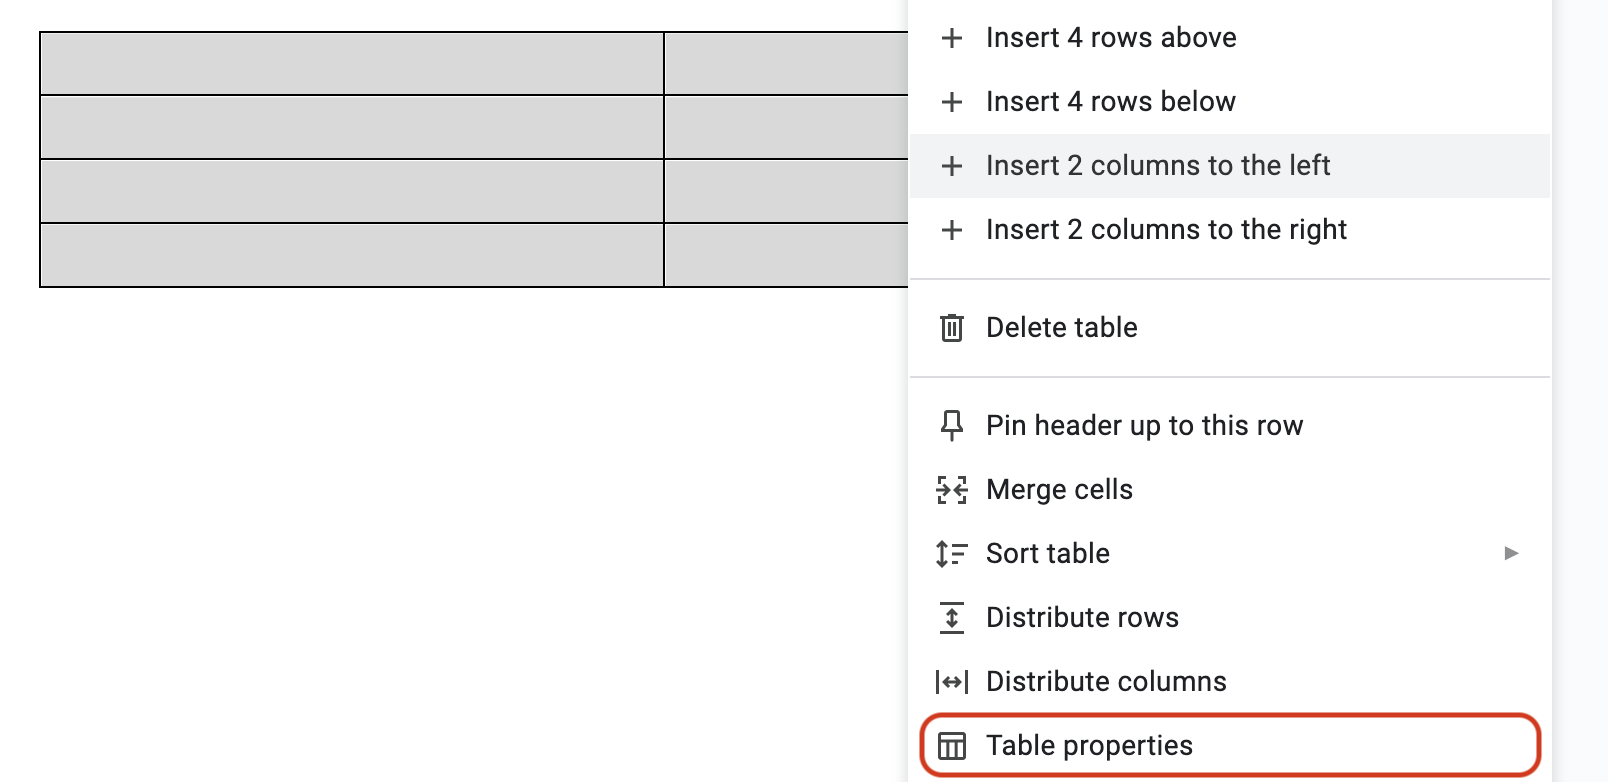
- Once added, select the entire table.
- Right-click on it and select “Table properties”.
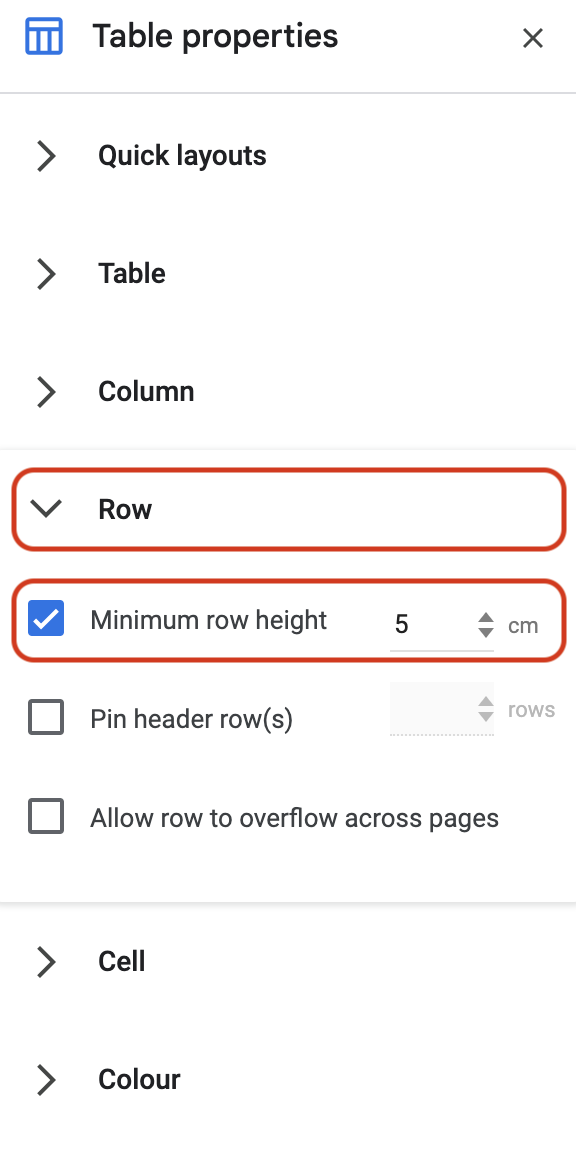
- Go to “Row” from the editor that appears on the right side of the screen.
- Check the “Minimum row height” option.
- Enter the row height as 2 inches.
- Now go to each cell of the table and write the headings or names of the things you want to display in the flashcard.
- Select the entire table again and align the text to the top left (avoid this step if it is top left by default).
- Go to the first cell.
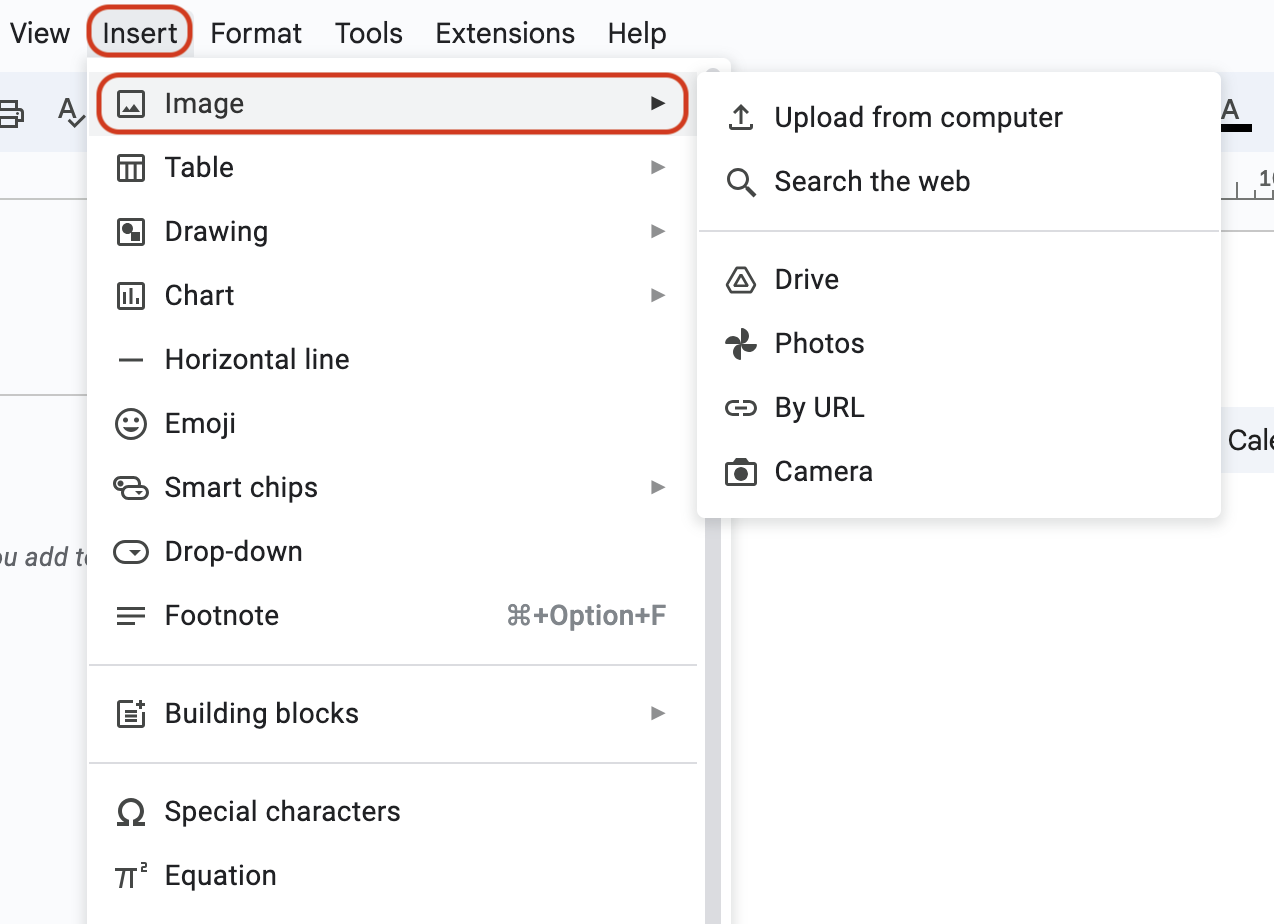
- Go to “Insert”.
- Select “Image” from the dropdown.
- Select and add the relevant image you want to put in the first cell.
- Drag and resize the shape and size of the image.
- Press Ctrl + Shift + E to center align the image inside the cell.
- Similarly, add, resize, and align images for all the other seven cells.
- If the table moves to the next page, resize the larger images to a point where the whole flashcard remains within a single page.
That is it. You have successfully created a flashcard. You can now save it as a PDF or even print it on paper.
Steps To Print Flashcards
There are two ways to print. The first one is directly from Google Docs and the other way is to download it on your computer as a PDF file and then print it or share it wherever you want.
Here are both methods explained step-by-step.
Printing Using Print Option
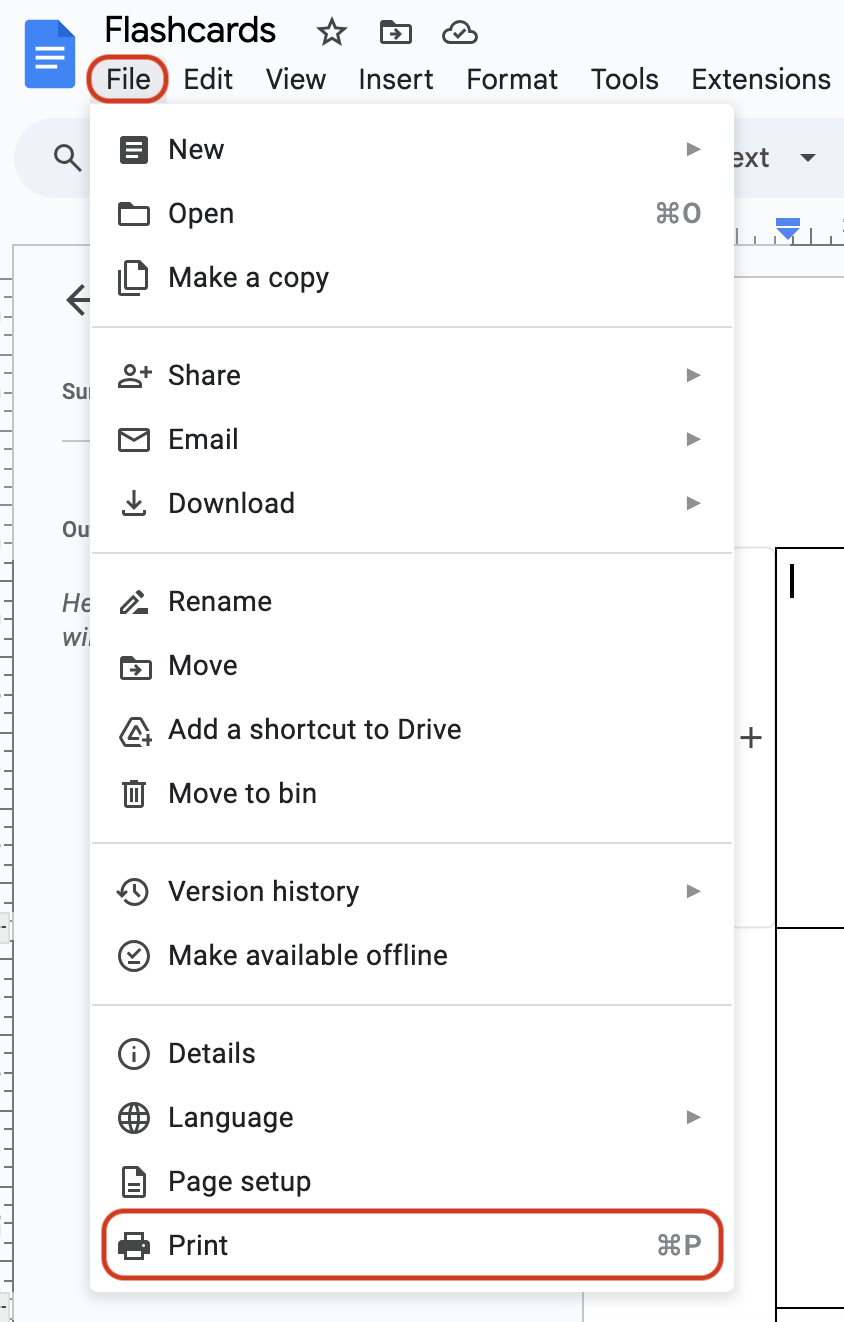
- Go to “File” from the main menu.
- Scroll down and select “Print” from the dropdown.
- Alternatively, you can also directly press Ctrl + P (or Command + P).
- Adjust the page and print setup and click on “Print”.
- If you want, you can also set up double-sided prints.
Printing with a PDF
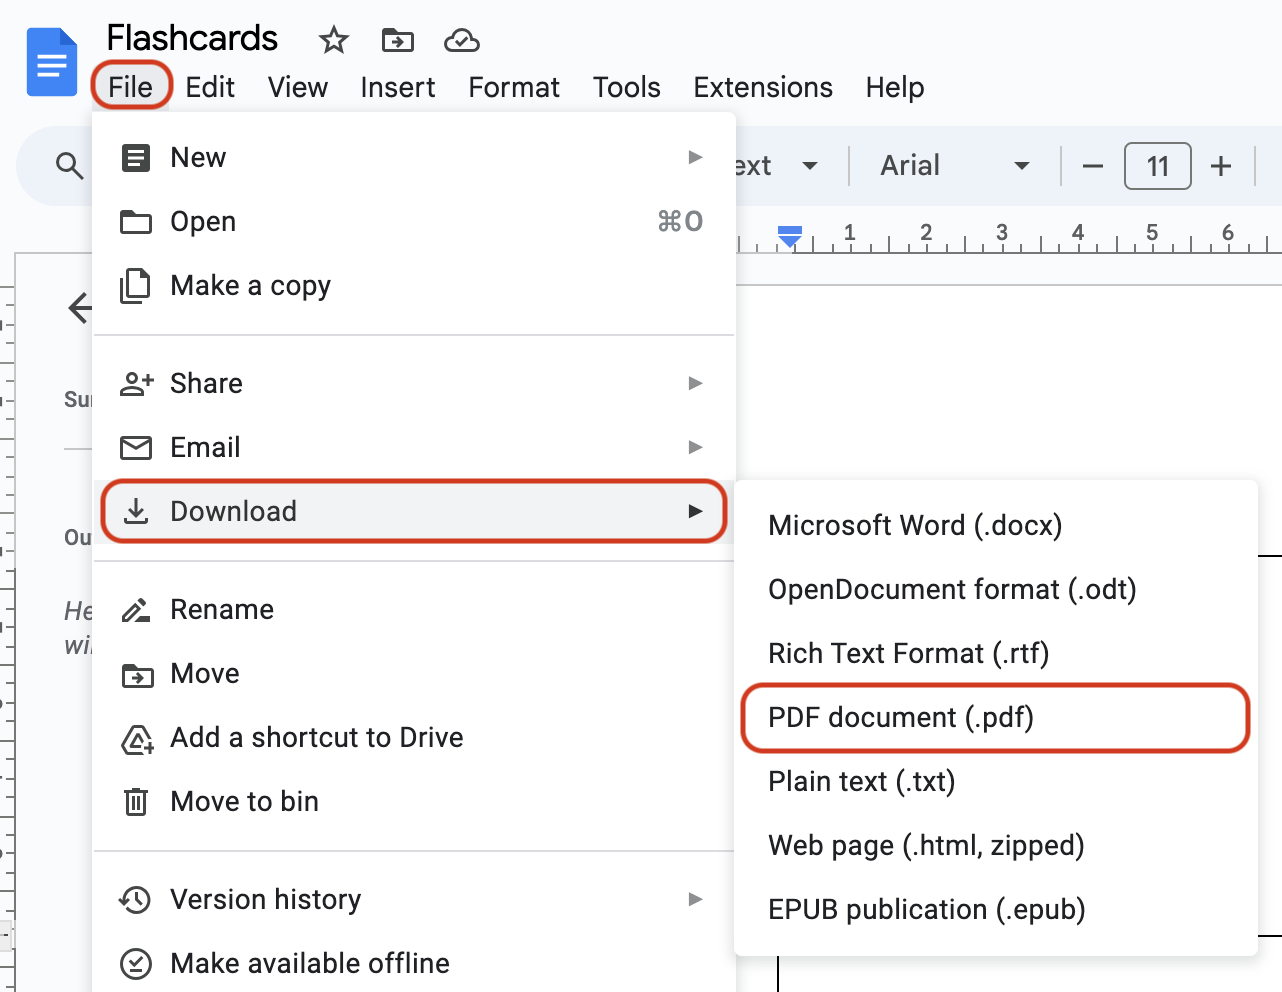
- Go to “File” from the main menu.
- Scroll down and select “Download” from the dropdown.
- From the sub-dropdown, select “PDF document”.
- Select the destination of the file and download it.
- Open the downloaded PDF document (preferably on Adobe Acrobat Reader).
- Click on the “Print” icon from the ribbon menu or press Ctrl / Comand + P.
- Adjust the page and print setup and click on “Print”.
Things To Consider
If you’re new to flashcards, you must understand the visual and dimensional aspects of it. You need to zero down on the size, the number of objects you want, and the kind of flashcard you want to make beforehand.
- Paper Size: Flashcards are mostly for print purposes. So if you have a printer available, then finalize the size of the paper you will print on.
- Flashcard Size: Based on the size of the paper you choose, you then have to take an empty paper and draw a flashcard roughly to understand the dimensions. Based on this rough drawing, you will get to know the size of images and text you would want.
- Image Quality: Make sure the quality of the images you select is high because when you print, poor-quality images will be dull on paper.
- Text vs Image: Once you decide the dimensions, decide on what heading you want to put for each object and whether or not you want to mention some brief information about that object.
- Templates: Finally, there are many templates available. You can either download templates or download the JPGs of the ones you like and try to create a similar one.
Frequently Asked Questions
Usually, the standard size of a flashcard is 3 x 5 inches or 5 x 7 inches. But since A4 is the most commonly available paper for print, people also consider the A4 size as a standard size.
You can either add a table with 2 columns and multiple rows or simply write down the index content in each line with appropriate line spacing.
Many resourceful websites have templates for flashcards. You can either download them or download any image you like and try to create a similar one yourself on Google Docs.
First of all, you change the orientation of the page from portrait to landscape. Then you can write the notecard with the addressing part on the top left, the date on the top right and the content in the middle.
Wrap Up!
Making a flashcard is very simple. If you are someone who uses Google Docs a lot for documentation and academic purposes, then there is no need to go to any fancy designing software. All you have to do is to take care of the page dimensions and you are good to go.
Leave a Reply